How to Fix “Windows Cannot Be Installed on This Disk” Error (Complete 2025 Guide)

May 1 2026

Windows cannot be installed on this disk error message during Windows setup screen

Introduction

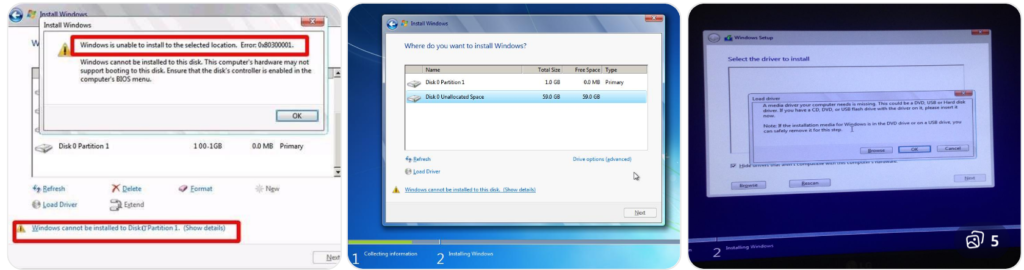
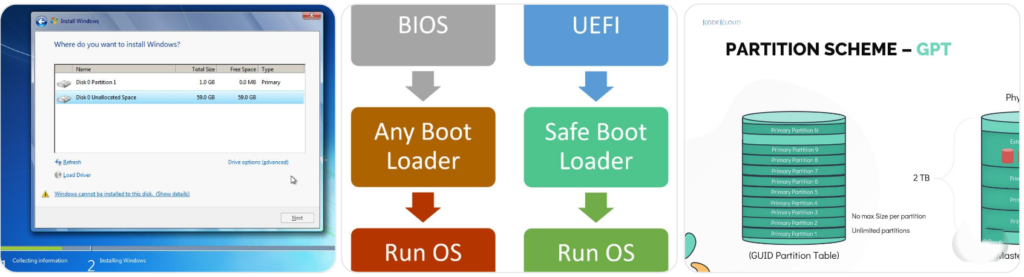
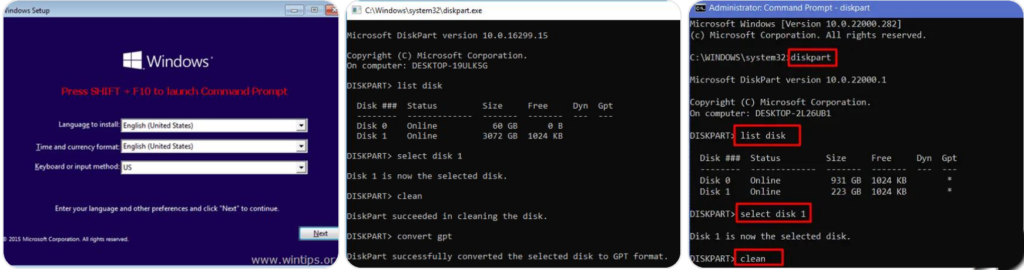
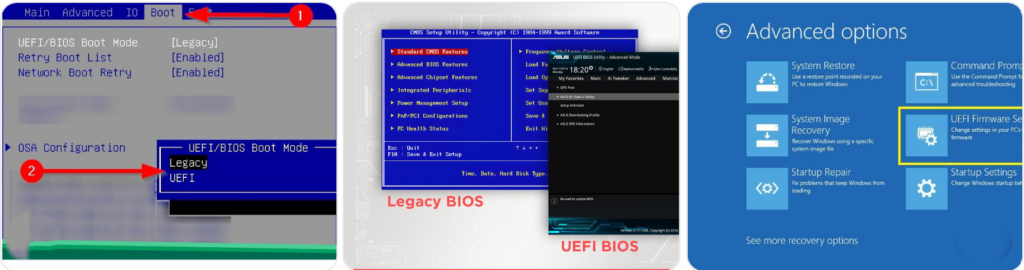
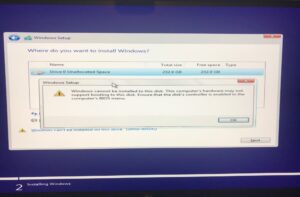
The error “Windows cannot be installed on this disk. This computer’s hardware may not support booting to this disk” is one of the most common issues users face during Windows installation. Whether you’re installing Windows 11 or Windows 10, this error usually indicates a mismatch between your system firmware settings and disk partition style.

If not handled correctly, this issue can completely block your OS installation. In this detailed guide, you’ll learn step-by-step fixes, root causes, advanced troubleshooting, and SEO-safe best practices to resolve this error permanently.

Understanding the Problem

Understanding the Problem

This error typically appears during the disk selection stage of Windows setup.

Main Causes

  • Incorrect disk partition style (GPT vs MBR)
  • BIOS/UEFI boot mode mismatch
  • Missing storage drivers (NVMe or RAID)
  • Corrupted or improperly formatted disk
  • Bootable USB created incorrectly

Why This Happens

Modern systems use UEFI + GPT, while older systems rely on Legacy BIOS + MBR. If your setup mixes these (for example, UEFI with MBR), Windows refuses installation.

Step-by-Step Solutions

1. Convert Disk to GPT Partition Style

Using diskpart command prompt to convert disk to GPT during Windows installation

Why This Works

UEFI systems require GPT disks. Converting fixes compatibility.

Steps

 1. Press Shift + F10 during setup

 2. Open Command Prompt and type:

				
					diskpart
list disk
select disk 0
clean
convert gpt
exit


 3. Click Refresh in setup and continue installation

Important Note:

  • This will erase all data
  • Always backup before proceeding

2. Enable UEFI Mode in BIOS

Changing boot mode from Legacy to UEFI in BIOS settings

Steps

 1. Restart PC

 2. Enter BIOS (F2 / DEL key)

 3. Locate Boot Mode

Change:

  •  4. Legacy → UEFI

 5. Save changes (F10)

Pro Tip

If Secure Boot is available, enable it for better compatibility with modern Windows.

3. Load Storage Drivers (NVMe / RAID)

Load storage drivers during Windows installation for NVMe or RAID disks

When Needed

  • NVMe SSD not detected
  • RAID setup enabled

Steps

 1. Download drivers from your motherboard manufacturer

 2. Copy to USB

 3. Click Load Driver in setup

 4. Select driver location

USB flash drives for driver transfer

4. Delete All Partitions and Start Fresh

Deleting all disk partitions during Windows installation setup

Steps

 1. Select Drive 0

 2. Delete all partitions

 3. Click “New”

 4. Let Windows auto-create partitions

Why This Works

Removes corrupted or incompatible partition structures.

Advanced Troubleshooting

Convert Disk to MBR (Legacy BIOS Systems)

Convert disk to MBR using Diskpart for Legacy BIOS systems

Use this only if your system does NOT support UEFI.

				
					diskpart
list disk
select disk 0
clean
convert mbr
create partition primary size=100000
active
format fs=ntfs quick
exit


Fix USB Installation Issues

Creating bootable USB using Windows Media Creation Tool

Prevention Tips

Backing up important data before Windows installation process

Final Checklist

  • Convert disk to GPT or MBR correctly
  • Match BIOS mode with partition type
  • Load drivers if required
  • Use fresh partitions
  • Use correct bootable USB

Conclusion

Fixing the Windows cannot be installed on this disk error is straightforward once you understand the root cause. Most issues arise from a mismatch between BIOS mode and disk partition style.

By following the steps above, you can ensure a smooth and error-free Windows installation process.

Read More

0 0 votes
Article Rating
Subscribe
Notify of
guest
0 Comments
Oldest
Newest Most Voted
Inline Feedbacks
View all comments
0
Would love your thoughts, please comment.x
()
x